Google Workspace Marketplace installs with GCP Cloud Functions
Published: October 8, 2022
Google Apps Script is a great on-ramp to learning coding and Javascript. Apps Script is also a great gateway drug to learning Node.js with GCP Cloud Functions. Let's explore!
In a previous post I showed how I used Google Apps Script to handle Google Workspace Marketplace installs with the Marketplace SDK. Apps Script was a great first go with it as the auth is seamless. As long as a user who appropriate access to the Project is the one running the Apps Script, the ScriptApp.getOauthToken() can handle the authorization on the UrlFetch call, allowing access to the data and then returning it to the Apps Script function.
After working with Apps Script for years, I grew my skills where I needed something more complicated at times. Apps Script projects now need to be attached to a standalone Google Cloud Platform project to be published. Moving beyond that basic connection to GCP will open up a ton of new integrations and opportunities. I will operate from the premise that you understand Apps Script enough to do some things and in turn know a little Javascript.
Let's jump into the deep end with Cloud Functions, Node.js, and a few other complicated bits at the surface level.
- Get into your GCP project and create a Cloud Function.
- Set up basic Cloud Function dependencies
- Import libraries for Auth
- Create a Service Account
- Setup Config files
- Deploy
Step 1: Go into your GCP project cloud console and find the Cloud Functions: https://console.cloud.google.com/functions/
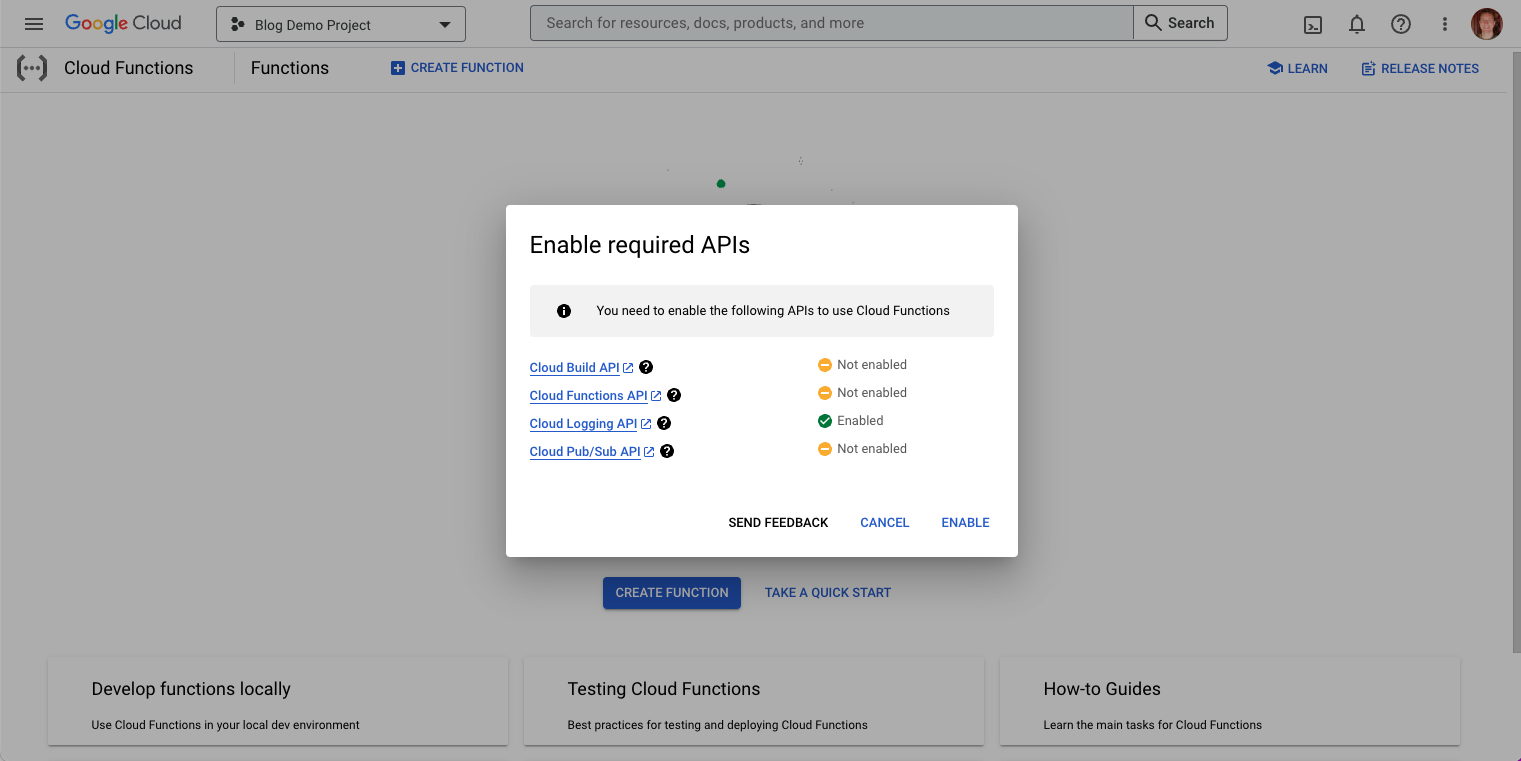
The first time you Create a Cloud Function on your Project you might need to Enable some requires APIs:
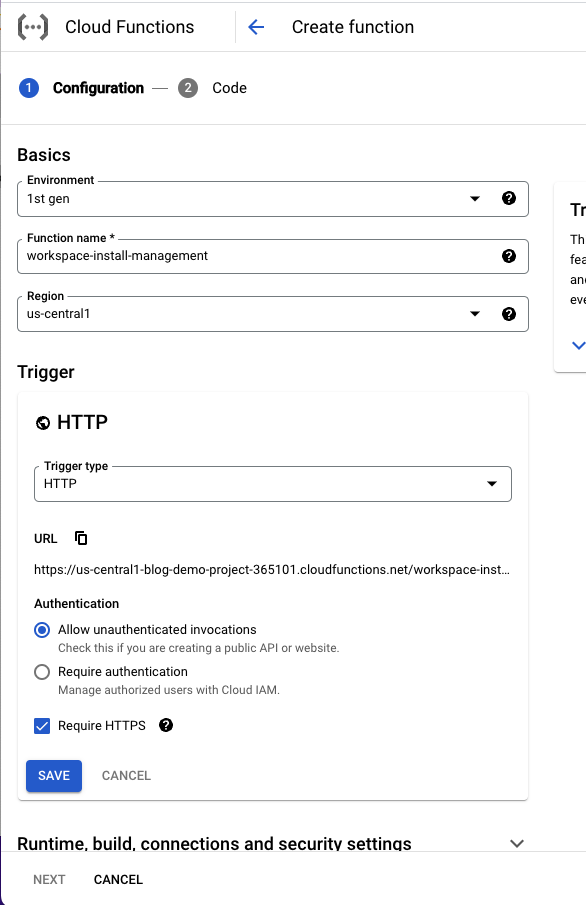
Configure Cloud Function: I use the default configuration for my Cloud Functions.
Note: To make your Cloud Function available to the Apps Script URLFetch make sure that you Allow unauthorized invocations.
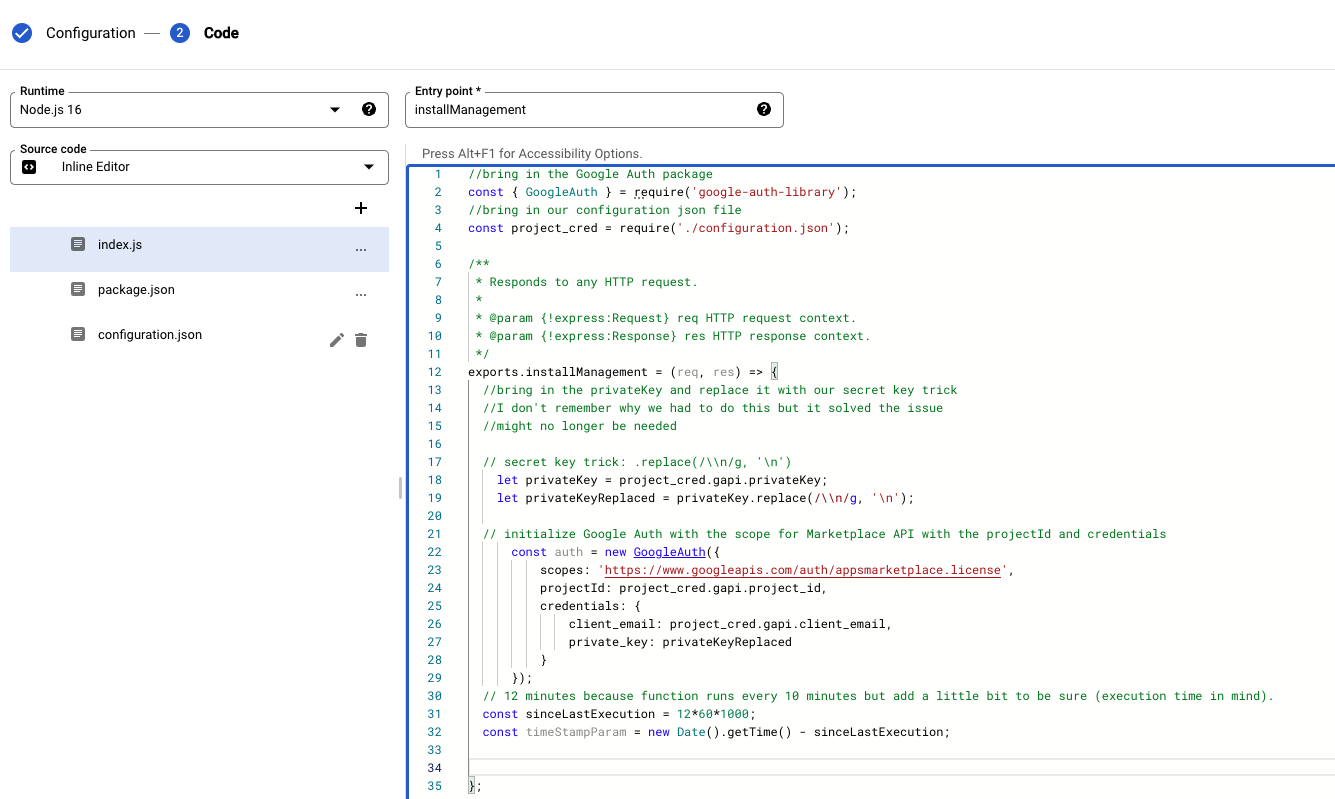
Once you click Next, you are into the Code!
Step 2: Setup Cloud Function dependencies:
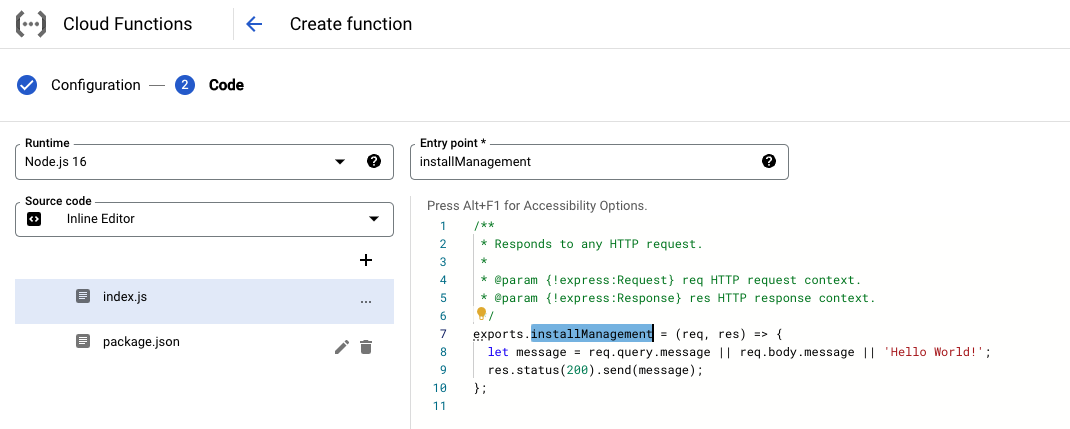
In your index.js file make sure your exports.functionName matches up with your Entry point name. This is the function that will run when the trigger endpoint is hit.
The way I think about Node.js in these Cloud Functions is I can create a URL that I can call from an external place (like my Apps Script) and do some stuff and send info back to the Apps Script. I am sure there is a better technical description so if you want to find one, Google Search is your friend.
This basic one will send back the message 'Hello World' or whatever message you send it in the JSON payload to the URL.
We want to do something more complex so we are going to add a package for the Google Auth.
Click over to the package.json file and add the dependency. You can add as many dependencies as you like, just comma separate them! Searching NPM is a great way to find packages. Here is the NPM page for the Google Auth Library we will use: https://www.npmjs.com/package/google-auth-library
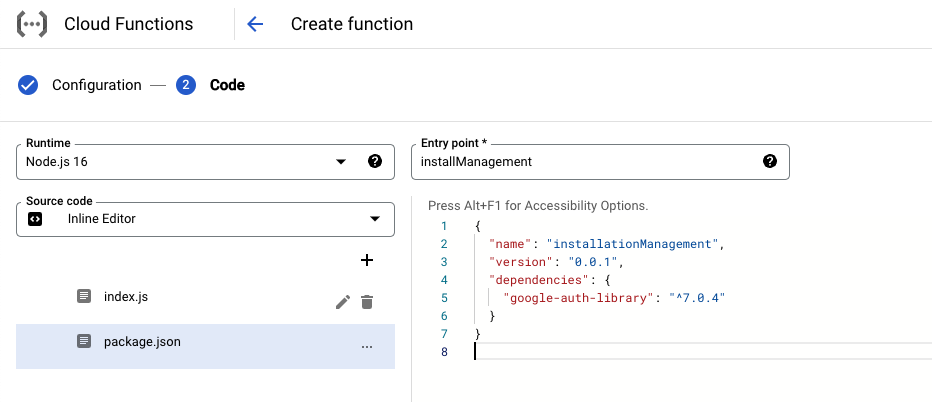
I added version 7.0.4 as that is the one I was using. I see they are up to 8.5.2 so you can read for yourself if you want to update my code.
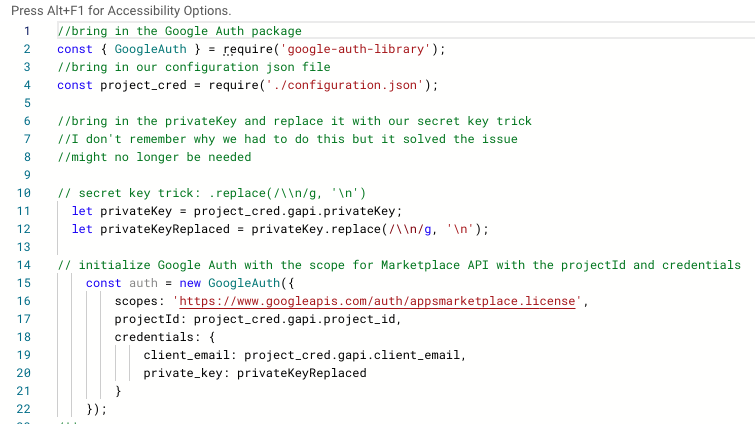
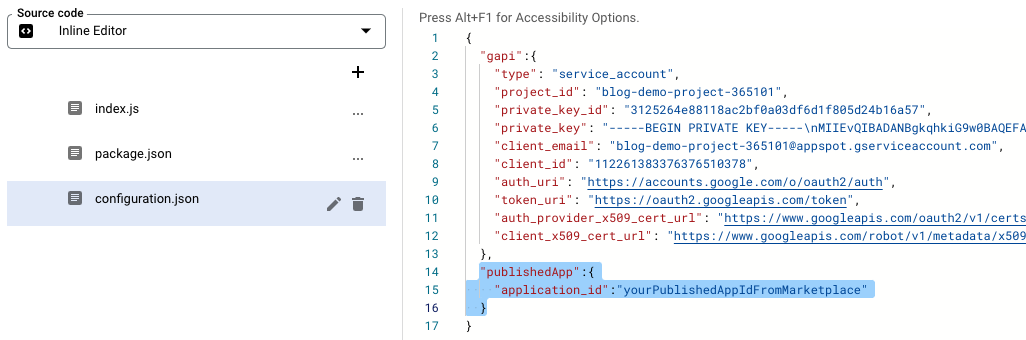
Now that we added that dependency we can bring it into our code and use it. The way I auth is using a Service Account which I stored the details in a file called configuration.json. There are a few bits of code here that need more explanation below.
At this stage you will need to get some Service Account credentials for the Marketplace API. If you haven't enabled the Marketplace API yet, open a new tab (since we haven't deployed this code yet so we don't want to navigate away from it) and go to the APIs in your console and Enable the Google Workspace Marketplace API: https://console.cloud.google.com/apis/dashboard
From there go to the Credentials tab of the API and click on Edit Service Account:
https://console.cloud.google.com/apis/api/appsmarket.googleapis.com/credentials
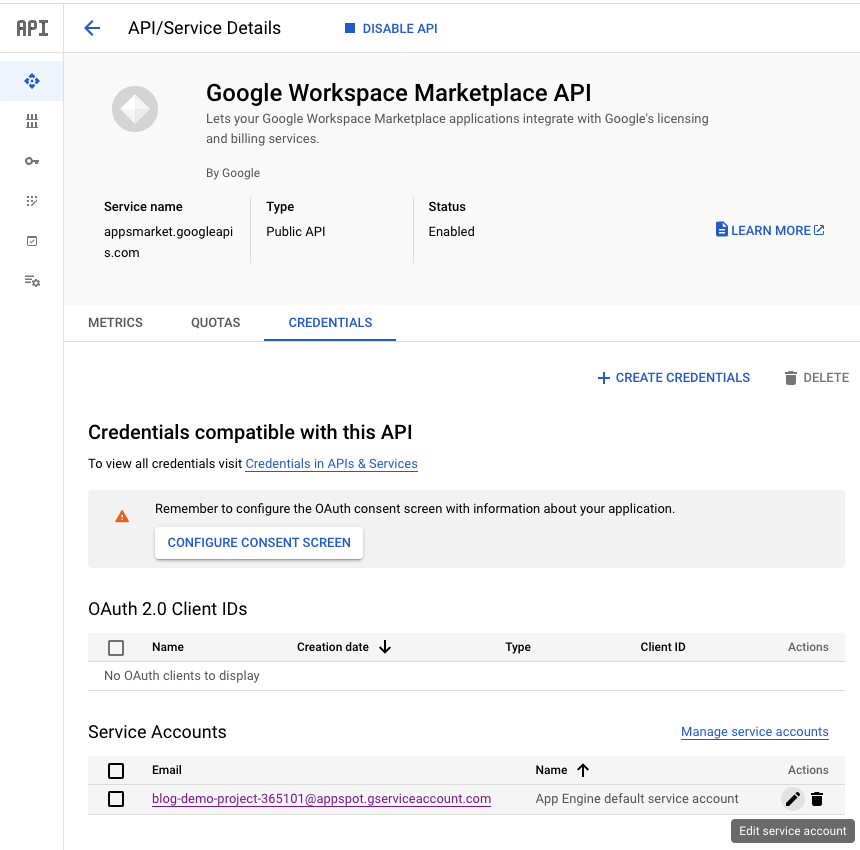
Download the JSON file and then copy/paste that into a new JSON file in your Cloud Function. I called my file configuration.json and named this credential "gapi" in that JSON.
Note: When you create this Service Account Google suggests using a Workload Identity Federation but I don't know how to do that yet. Feel free to try it if you like!
Note 2: You can also read all about the Google Auth on their NPM page with some examples: https://www.npmjs.com/package/google-auth-library#choosing-the-correct-credential-type-automatically

I use this configuration info in my code by bringing it into the code with this code
//bring in our configuration json file
const project_cred = require('./configuration.json');
Notice how we called values from this json in our code like when we pulled in our privateKey:
let privateKey = project_cred.gapi.privateKey;
I don't remember why I need to do the Private Key secret trick but I remember I was trying for like 2 weeks to get something up and running and that was the bit the solved my issue. Maybe it is not needed any longer but I do love me some technical debt so let's carry it on through :) Feel free to not use it and see if your code works! Hit me up on Twitter or LinkedIn and shame my coding if you get it to work ;)
OK. Now our Google Auth is ready to go with our Service Account that has the ability to call the Marketplace API. Let's call it in our exported function! (We probably shoulda put it there in the first place...)
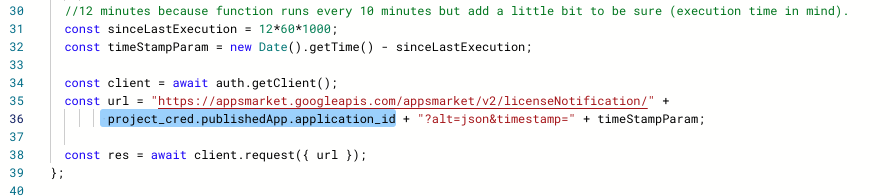
Note: In the screenshot below and any following screenshot, the parameters of the function are incorrect they should be (request, response) instead of (req, res)
I have found that the Marketplace API works best when using the Timestamp Parameter. So I built it in the code here with the anticipation I will later trigger it every 10 minutes with a Cloud Pub/Sub timed trigger. Essentially it will look back for the past 12 minutes (10 minutes plus 2 minutes to allow it to run to make sure we don't miss any installs during execution) and bring in all installs during that time period.
Now when we call the Marketplace API url, we need to make sure we wait for the data to come back. So we use an await here. But we can only use an await in an async function, so we add that async to our exported function too.
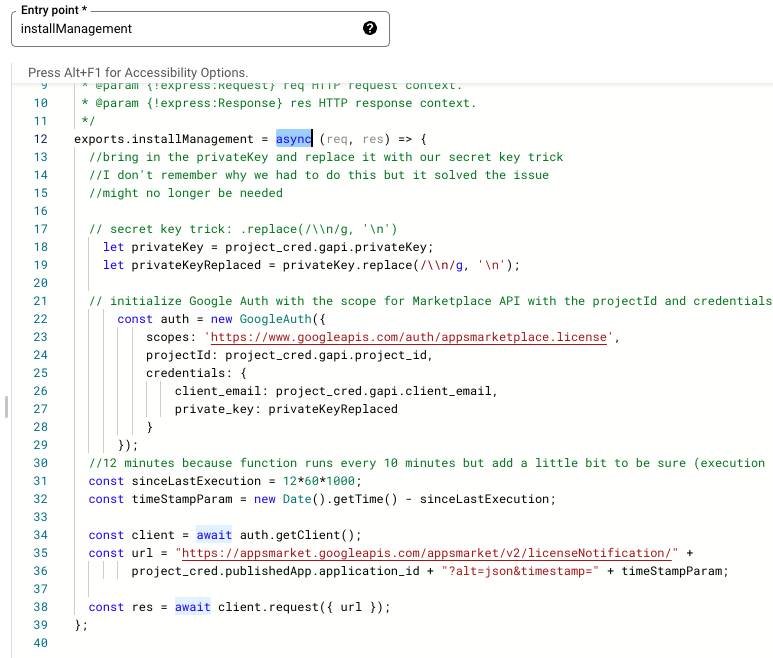
We also added another value to our credentials.json with the published App application_id. We need to call that in our Marketplace API Url.
In credentials.json:
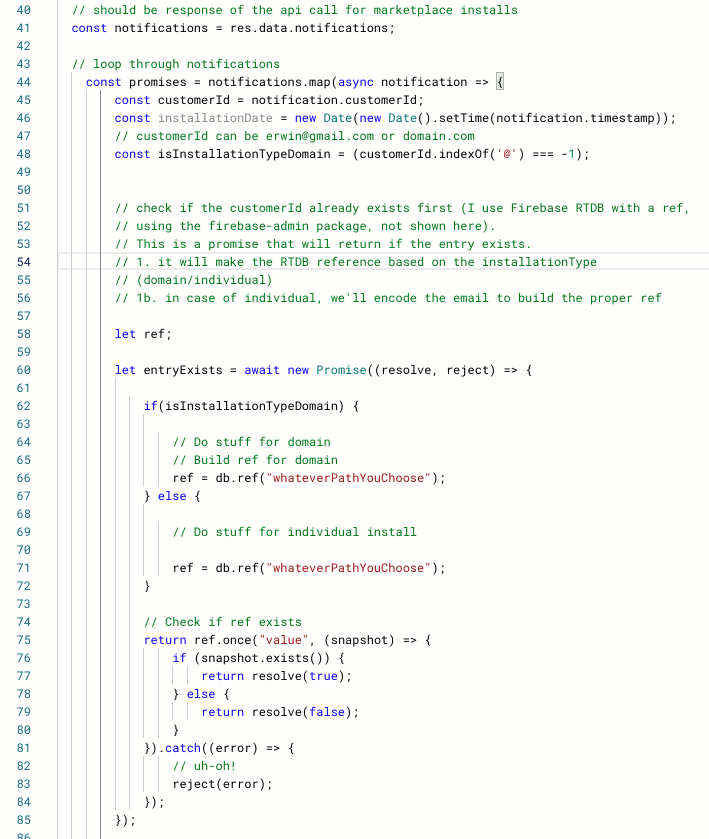
OK so now the crazy code to roll through all the notifications that the Marketplace API returns. I left out some code bits where I call the Firebase Real-Time Database in the function as I didn't want it to get too crazy. In my code, I check the RTDB to see if the user already exists, if not I write their install time to the RTDB and it creates their basic info. (I use RTDB for licensing as well). I also kickoff my onboarding welcome email here but again didn't want to complicate this code. (I use Mailjet and there is an awesome Mailjet Node package that hooks in with a couple of lines of code).
If you haven't experienced Promises yet, that is fine. Essentially the code makes sure that everything is returned before moving forward.
This code get the notifications
// should be response of the api call for marketplace installs
const notifications = res.data.notifications;
and then loops through them to see if the user is already existing in our RTDB and then processes them appropriately. It classify if they are new installs, deletions, or provisions (re-installs)
Now based on that result if it exists already it processes it:
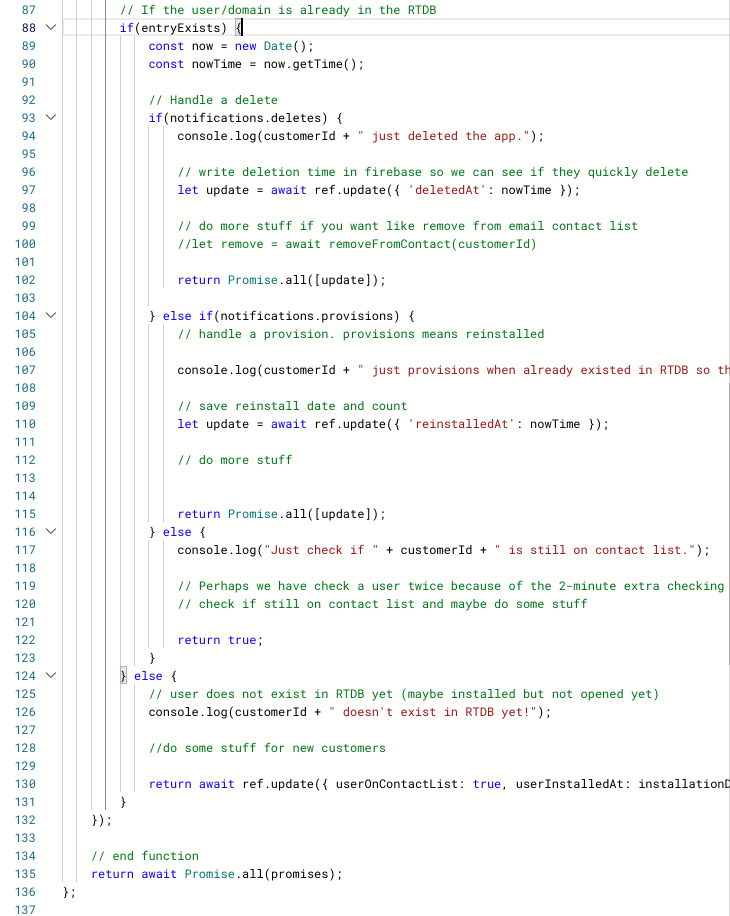
That is the end of the function. Click Deploy!
I have also put a copy of this code up on Github: https://github.com/AutomagicalApps/GCP-Marketplace-Install-CloudFunction-Demo
Hit me up on Twitter or LinkedIn if you have questions :)